Friday, March 29, 2013

'Sending Love and COURAGE' Birthday Card


Be strong and COURAGEous, and do the work.
 Do not be afraid or discouraged, for the Lord God, my God, 
is with you.
 He will not fail you or forsake you
until all the work … of the Lord is finished.
I Chronicles 28 : 20


Welcome to Digi Desserts Fridaze in connection with My Paper Crafting !    We, on the Design Team, are to create a project using a Digital File from the vast selection at MyPaperCrafting.com every Friday, share them with You and encourage You to visit over there, get the FREE Digi File for today, make a project with it and link it for all to see.  The ‘winning’ designer is highlighted next week as a Guest Designer!   It’s an easy and fun thing to do on the weekend! 

For this week’s project I made a Birthday Card for my Special ‘Baby’ Brother.  He has unfortunately been unemployed for quite some time – as I have been – and he FINALLY became employed this past week!  That’s the ‘Good News.’   The ‘Bad News’ is that the job is in New York State for 7 months and he has had to move there, leaving his family back in MI.  It’s going to be hard on all of them, so I wanted to send him some Love and EnCOURAGEment for his birthday this week.  Remembering how as children we would watch the ‘Wizard of Oz’ on TV each spring – and that my brother is great at doing ‘voices and dialects’ (as am I…it runs in the family!) - I decided to send him a Cowardly Lion and a bit of ‘COURAGE!’  He already has Brains and Heart!!  *smile*


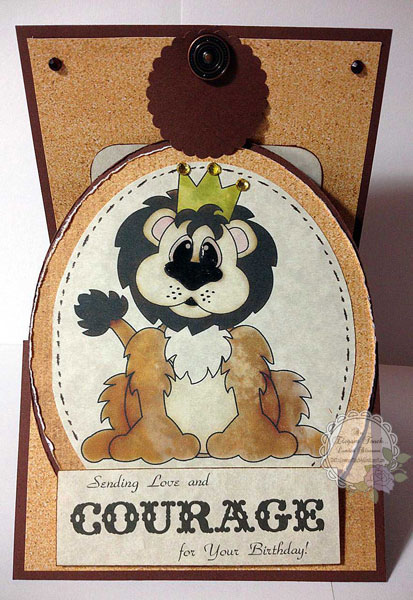
 I used the ‘King of my Heart ds’ from MPC.  Here’s the original file –

*  I put the file into my ‘Perfect Effects Free’ program and applied the Dreamland Action 2 times and then the Earth Action to get to the desired effect – making it look like real fur on the lion.  I then put it into my PSE 10 program and printed it from there onto cream parchment.

*  I added Glossy Accents to the eyes, nose and mouth.

*  I distressed the edge of the oval on which the lion was printed.  I added faux-stitching around the edge.

*  I adhered the oval – and a dark brown shadow oval – to the front panel of the card.  The card is 4.25 x 11” cardstock, folded at 2.75” and 5.5” and mountain and valley folded.


*  I typed the front sentiment and the inside verse in my PSE 10 program and printed them on cream parchment.  I adhered the front sentiment with PopDots.


*  I added brown gems to the corners.  I attached the Prop Holder with a brad.  I covered the back of the brad with a remnant of paper and added a note about how to prop it.

 
**********

Be sure to visit Melin at MPC and sign up for her blog and Newsletters, join us on the Blog Hops at various times of the year and check there weekly to see what’s offered in her Store!  She offers Amazing Digi and Cutting Files and I’m SURE that you will find lovely items to enhance your paper-crafting projects!  As always, please feel free to contact me if you have any questions about what or how I have done on here -  Happy Crafting!  ;-}

**********

Here is the FREE digi-file for this week at My Paper Crafting.  Be sure to stop over there, if you haven’t already, see all of the other creative projects, get the file, make a project of your own using a digi-file from My Paper Crafting and then link it there so we can see it, too!

FREE file  -  

I'm also excited to tell you about a new twist this term.  We invite YOU to participate in our Digi Dessert Fridaze weekly posts.  Just create something using a digital image and link up at the end of the post. If you use a Paper Crafting World image, you will receive 2 chances to win.  That's right!  One lucky project will be selected each week to receive a digital image from Paper Crafting World.  If you use a PCW file, please add PCW after your name.   And, it will be so much easier to participate with our Link Up because there's a tab on the home page that will bring you directly to this DDF page.  You'll have until next Thursday 12 noon (EST) to link up.  The lucky winner will be announced in the next PCW post on Friday.

Be sure to come back here often as I showcase other Paper Crafted Projects and Photo Digital Restorations that I make – several days each week.  Sign up to receive my Posts so you’ll know when I’ve posted something – usually 3 to 4 times weekly.  Tuesdays every other week are Cutting files from MPC – Thursdays are Tags and ATCs – Fridays are Digi Files from MPC -  Other days may be other projects! 

Check out my Tabs in the Header above to see what else I do and can do for you!  Let me know if you have questions on anything here – or if I can do anything for You!  Have a Great Week!  See you again soon!

B’ Bye!
(You can take the Gal out of the Sky, but You can’t take the Sky out of the Gal!)  ;-}

Thursday, March 28, 2013

Tag: Cross in White


Christ carried our sins in his body on the CROSS.
 He did this so that we would stop living for sin
 and live for what is right.
 By his wounds you were healed.
1 Peter 2 : 24


Welcome to the recently added Thursday Totally Tags ‘n’ ATCs over at MyPaperCrafting.com!  Every Thursday we on the Design Team will begin doing a team post featuring Tags n' ATC's.  We will have a specific Theme each week featuring an element, technique or embellishment.  We’ll all come up with something excitingly different – using various types of tools, etc. to create our projects...i.e., Cricut, CAMEO, Spellbinders, punches, stamps, paint, material, lace, inks, etc.   The sky's the limit!  The only restriction...  If we use SVG's or Digi's, we will only use those from the vast selection at PCW.

The Theme for this week’s projects is ‘The Cross.’  I decided to do something I’ve thought about for quite some time and I did the whole project in White!


*  The Tag itself is cut from this file –


*  The Cross Medallion is cut from this file and adhered with PopDots to give depth –


*  I punched some MS Leaves and Pine Branches and adhered them.

*  I used this file for the large flower, rolling the petals inward rather than outward as I usually do.  I added small flowers punched from a MS punch.  I added Pearl gems to all centers and to the Medallion.


*  I added a very narrow white satin ribbon to the top and tied a bow.


Have You made any interesting Tags recently?  I’d love to see them!  Let me know if you have any questions about anything I’ve done here or on any other blog post -  Blessings until next time!

**********

Thanks for visiting here today!  I hope you take a few minutes to check all of the Tag/ATC creativeness on the other blogs, too!    Melin should have a Free File for today on her blog, also!  Here it is -


 Be sure to remember MPC for all of your Cutting and Digital files.  Tomorrow is our Digi Dessert Fridaze post, every other Tuesday is a Cutting File post and in between I may post some other projects. 

B’ Bye!
(You can take the Girl out of the Sky, but You can’t take the Sky out of the Girl!)  ;-}

Tuesday, March 26, 2013

An Easter Wreath/The Cross


36 You know the message God sent to the people of Israel,
 announcing the good news of peace through Jesus Christ, who is Lord of all.
 37 You know what has happened throughout the province of Judea,
 beginning in Galilee after the baptism that John preached—
 38 how God anointed Jesus of Nazareth with the Holy Spirit and power,
 and how he went around doing good and healing all
who were under the power of the devil, because God was with him.
39 “We are witnesses of everything he did in the country of the Jews
and in Jerusalem. They killed him by hanging him on a cross,
 40 but God raised him from the dead on the third day and caused him to be seen.
 41 He was not seen by all the people, but by witnesses
whom God had already chosen—by us who ate and drank
with him after he rose from the dead.
 42 He commanded us to preach to the people and to testify
that He is the one whom God appointed as judge of the living and the dead.
43 All the prophets testify about him that everyone who believes in him
 receives forgiveness of sins through his name.”
Acts 10 : 36 - 43


Welcome to our 2013 Die Cut Tuesday New Release and Link Up over at www.MyPaperCrafting.com !  Be sure and pop over there and see what Melin and our other Designers have set up for this Showcase – and the New Release for today.

Today’s project is an Easter Wreath – a small grapevine wreath which includes a cross I made from twigs fallen on my patio, a real egg which I ‘blew out’ and then covered with scripture pages and a ribbon, an origami Lily and other handmade flowers and leaf sprigs –


*  I used a small 8” grapevine wreath that I’ve had for a while and hadn’t decided what to use it for.  I decided to make this project ‘Earthy’ with a touch of spring blue.

*  I cut several twig pieces to size, hot glued them together and then wrapped the joint with twine, forming a Cross.  I adhered the Cross with my hot glue gun toward the right side of the wreath.

*  I blew out several eggs the other day and used the ‘innards’ in a recipe.  I rinsed and dried them.  I covered this one with ripped pieces of scripture pages from the paperback Bible from the $$ Store and my homemade ModPodge.  I added a velvet ribbon.  This egg represents the new birth of Spring, Jesus emerging from the Tomb and the new life we as Christians have because of His resurrection.

* I saw an Origami Lily on Pinterest and found instructions online and on YouTube.  It was a bit more tricky than I’d hoped – perhaps because I made a fairly small one - but it was ‘possible.’  I wanted to include a Lily, as Jesus is the ‘Lily of the Valley’  – (I am the rose of Sharon, and the Lily of the valleys.  Song of Solomon 2:1)   I made it light blue rather than white.

* I cut 2 ‘vines’ (Crossv 13 cf) and punched many leaves and pine branches from medium olive and light sage green cardstock (MS punches).

*  I cut (Butterfly ‘n’ Tag 221 cf) and punched (MS punch) white Roses in various sizes and formed them, adding light blue gem centers to the larger ones and pearls to the tiny ones.

*  I nestled the egg , branches and flowers in dried moss adhered with my glue gun.

These are the cutting files I used today – using my SCAL3 and Silhouette CAMEO –


Be sure to check out Melin’s post for the FREEBIE File for today (I’ll Update here when it’s available there - ) and then make something and link up over there.  I look forward to seeing YOUR creations!  Come back again and visit soon -  ;-}  -  Here it is -


Be sure to come back here often as I showcase other Paper Crafted Projects and Photo Digital Restorations that I make – several days each week.  Sign up to receive my Posts so you’ll know when I’ve posted something – usually 3 to 4 times weekly.  Tuesdays every other week are Cutting files from MPC – Thursdays are Tags and ATCs – Fridays are Digi Files from MPC -  Other days may be other projects! 

Check out my Tabs in the Header above to see what else I do and can do for you!  Let me know if you have questions on anything here – or if I can do anything for You!  Have a Great Week!  See you again soon!

B’ Bye!
(You can take the Gal out of the Sky, but You can’t take the Sky out of the Gal!)  ;-}

Friday, March 22, 2013

'Pearlized' Roses Card


I am the ROSE of Sharon, and the lily of the valleys.
Song of Solomon 2 : 1


Welcome to Digi Desserts Fridaze in connection with My Paper Crafting !    We, on the Design Team, are to create a project using a Digital File from the vast selection at MyPaperCrafting.com every Friday, share them with You and encourage You to visit over there, get the FREE Digi File for today, make a project with it and link it for all to see.  The ‘winning’ designer is highlighted next week as a Guest Designer!   It’s an easy and fun thing to do on the weekend! 

For this week’s project I have made a card using the ‘Roses Double ds’.  Here is my card –


*  I put the original file into my Free program, ‘Perfect Effects Free,’ and did a couple of Actions on it.  I changed the color first in Sepia Toner - (making it in Grays and Browns) -


-  and then changed the ‘texture-look’ of the Digi with another Action - Earth - (giving  it a mottled look) -


*   Easy!  I printed it on white cardstock and fussy-cut out the Digi.  I hand embossed it on the back side, following the lines from the front and inked the edges with Charcoal ink.  
      (You can see several other options I did in this previous post -

*  Using an Oval-nested Coluzzle, I cut an oval from a piece of light Gray cardstock.  I embossed it in a 4-cornered design folder.  I gently inked over the raised areas with Charcoal ink.

*  I cut an oval from medium Brown cardstock and adhered in under the Gray oval.

*  I adhered the Gray cardstock to a Kraft cardstock card, raising it up with PopDots at various places.  I adhered the Roses with PopDots, also, giving the card dimension and depth.  The card folds at the top, so it could stand on its own.

*  I added Pearl Gems to the ‘dots’ on all 4 sides and Brown Gems to the centers of the Roses.

*  I didn’t add a Sentiment, so it could be used for a variety of occasions, but one could be added in the bottom left corner.

Here is the original file I used –


**********

Be sure to visit Melin at MPC and sign up for her blog and Newsletters, join us on the Blog Hops at various times of the year and check there weekly to see what’s offered in her Store!  She offers Amazing Digi and Cutting Files and I’m SURE that you will find lovely items to enhance your paper-crafting projects!  As always, please feel free to contact me if you have any questions about what or how I have done on here -  Happy Crafting!  ;-}

**********

Here is the FREE digi-file for this week at My Paper Crafting.  Be sure to stop over there, if you haven’t already, see all of the other creative projects, get the file, make a project of your own using a digi-file from My Paper Crafting and then link it there so we can see it, too!

FREE file  -  
I'm also excited to tell you about a new twist this term.  We invite YOU to participate in our Digi Dessert Fridaze weekly posts.  Just create something using a digital image and link up at the end of the post. If you use a Paper Crafting World image, you will receive 2 chances to win.  That's right!  One lucky project will be selected each week to receive a digital image from Paper Crafting World.  If you use a PCW file, please add PCW after your name.   And, it will be so much easier to participate with our Link Up because there's a tab on the home page that will bring you directly to this DDF page.  You'll have until next Thursday 12 noon (EST) to link up.  The lucky winner will be announced in the next PCW post on Friday.

Be sure to come back here often as I showcase other Paper Crafted Projects and Photo Digital Restorations that I make – several days each week.  Sign up to receive my Posts so you’ll know when I’ve posted something – usually 3 to 4 times weekly.  Tuesdays every other week are Cutting files from MPC – Thursdays are Tags and ATCs – Fridays are Digi Files from MPC -  Other days may be other projects! 

Check out my Tabs in the Header above to see what else I do and can do for you!  Let me know if you have questions on anything here – or if I can do anything for You!  Have a Great Week!  See you again soon!

B’ Bye!
(You can take the Gal out of the Sky, but You can’t take the Sky out of the Gal!)  ;-}

Thursday, March 21, 2013

Tag: 'Purple' - Floral Spray and Butterfly


Who can find a virtuous woman? - 
For her price is far above rubies…
She maketh herself coverings of tapestry; 
her clothing is silk and PURPLE.
Psalm 31 : 10 & 22


Welcome to the recently added Thursday Totally Tags ‘n’ ATCs over at MyPaperCrafting.com!  Every Thursday we on the Design Team will begin doing a team post featuring Tags n' ATC's.  We will have a specific Theme each week featuring an element, technique or embellishment.  We’ll all come up with something excitingly different – using various types of tools, etc. to create our projects...i.e., Cricut, CAMEO, Spellbinders, punches, stamps, paint, material, lace, inks, etc.   The sky's the limit!  The only restriction...  If we use SVG's or Digi's, we will only use those from the vast selection at PCW.

The Theme for this week’s projects is ‘Purple’ – which is my FAVORITE color (actually, Lavender is my Favorite shade of Purple!), so it was a Pleasure for me to work on it!  I used several of Melin’s files and here is how it turned out –


*  I recently acquired some Gorgeous deep, rich purple cardstock – Aubergine, actually – which I used for the base of the Tag and for the tiny punched flowers.  I used this file for the Tag – ‘Frame Ornate 13a Set cf’


*  I embossed the base with a Wicker Weave folder.  I embossed the frame with a Woodgrain folder and then lightly inked it with Dusty Concord.  Both were embossed in my Cuttlebug.

*  I used the Flourish from this file and cut it from Sage cardstock – ‘Cross v13 cf’ -


* I adhered a piece of Cream lace to the bottom of the Frame.
*  I made Ribbon Roses in 2 sizes using Cream ribbon.  
            **  Cut/punch a small circle of cardstock.
            ** Tie a knot in the end of ribbon and adhere to center of circle with hot glue.
            **  Twist and adhere ribbon in small increments as you move around the knot and then continue outward on each ensuing circular row until it is the size you want.  Cut ribbon from spool, adhering about ¼” underneath to the cardstock.  Trim extra cardstock, if necessary.  (Optional:  I often adhere a Gem in the center.   On these, I didn’t.)
*  I made Paper Flowers in 3 sizes using Lavender cardstock and this file – ‘Butterfly ‘n’ Tag221 cf’


            **  I cut several each of 3 sizes of the Flower file with my Silhouette CAMEO.  Before removing them from the cardstock on my mat, I stamped them with a Leafy ‘all-over’ stamp and ‘Dusty Concord’ Distress Ink to give the plain cardstock some interest.  After removing the pieces from the mat, I gently inked the edges with the same ink.
            **  Using my hand embosser and on a foam piece, I embossed the back side edges of the flowers.  I then turned them right side up and embossed the center, moving in small circular motions to make the petals rise up.
            ** For the largest flower, I glued 2 of each of the 3 (small medium, large) sizes together, alternating where the petals are.  Then I glued the 3 sections together, alternating where the petals lay.  For the medium flower, I used the medium and small sizes and the same routine of gluing.  For the smallest flower, I just used 2 of the smallest size.  I added Pearl Gems to the centers of each flower.
            **  I raised up the largest flower using 3 stacked PopDots to give the spray depth and then nestled the other flowers and leaves around it.
           
*  I punched tiny Aubergine flowers with my MS punch (large and small ones on the same punch) and hand embossed them , also, and adhered them in 2 sizes – (1 large and 1 small together and then 2 small together).  I added tiny Pearl Gems to the centers.
*  I cut tiny flowers from Vellum using this file – embossed the centers and added Dark Purple Gems to the centers – Flower ‘n’Branch 918 cf’


*  I punched Leaf Branches and Pine Branches using 2 MS punches from Sage cardstock and Olive patterned wallpaper.  I ‘filled in’ with these.
*  I added Gems to the 4 points of the frame.

  
*  I cut a Lavender Butterfly and Vellum ‘base’ using the Butterfly ‘n’ Tag 221 cf’  (see above).  I inked the edges with the Dusty Concord ink, bent the wings up and added Pearl and Purple Gems for the body.

*  I added a Cream Sheer Ribbon to the hole I punched in the top.


*  I adhered the piece of Lavender cardstock that was cut from the frame to the back; to stamp a sentiment, write a note and sign it when I give it away.

Have You made any interesting Tags recently?  I’d love to see them!  Let me know if you have any questions about anything I’ve done here or on any other blog post -  Blessings until next time!

**********

Thanks for visiting here today!  I hope you take a few minutes to check all of the Tag/ATC creativeness on the other blogs, too!    Melin should have a Free File for today on her blog, also!   Here it is -

 Be sure to remember MPC for all of your Cutting and Digital files.  Tomorrow is our Digi Dessert Fridaze post, every other Tuesday is a Cutting File post and in between I may post some other projects. 

B’ Bye!
(You can take the Girl out of the Sky, but You can’t take the Sky out of the Girl!)  ;-}